
EPDM flooring has become a popular choice for playgrounds, jogging tracks, fitness areas, sports facilities, recreational spaces, schools, parks, and outdoor activity zones. Its combination of shock absorption, flexibility, weather resistance, durability, and design versatility makes it suitable for areas where safety and long-term performance matter.
However, the quality of an EPDM floor depends heavily on how it is installed. Even premium EPDM rubber granules can fail prematurely if the base is poorly prepared, moisture is trapped below the surface, the binder is incorrectly mixed, or the installation is carried out without proper thickness and curing control.
So, how is EPDM flooring installed?
A professional EPDM flooring system is normally constructed through several carefully controlled stages, beginning with site inspection and base preparation and ending with curing, inspection, and handover.
This guide explains the complete EPDM flooring construction process step by step, including substrate preparation, primer application, rubber granule mixing, techniques, curing, quality checks, maintenance, and commonmistakes.
What Is Flooring?
EPDM stands for Ethylene Propylene Diene Monomer, a synthetic rubber material known for its excellent resistance to weathering, sunlight, ozone, temperature changes, and general outdoor exposure.
In sports and recreational flooring, EPDM is commonly supplied as colored rubber granules. These granules are mixed with a polyurethane binder and installed over a properly prepared base.
Depending on the application, an EPDM system may include:
- Concrete or asphalt base
- Primer
- Shock pad or cushioning layer
- EPDM rubber granules
- Polyurethane binder
- Wearing surface
- Colored patterns or line markings
The exact construction depends on the intended application, required impact attenuation, site conditions, traffic level, drainage requirements, and project specifications.
Where Is Flooring Used?
EPDM flooring is suitable for a wide range of applications.
Common installations include:
- Children’s playgrounds
- Jogging and walking tracks
- Outdoor gyms
- School activity areas
- Sports training zones
- Fitness centers
- Recreational parks
- Multipurpose play areas
- Poolside surroundings
- Residential community play areas
- Athletic and recreational facilities
- Shock-absorbing safety surfaces
The system can also be designed in different colors and patterns, allowing architects and facility developers to create visually attractive spaces without compromising functional performance.
Step-by-Step Process
Site Inspection and Measurement
The first stage is a detailed inspection of the installation area.
A professional flooring contractor should evaluate the existing surface before ordering materials or beginning construction.
Important factors include:
- Existing substrate condition
- Surface level and slope
- Cracks and damaged areas
- Drainage arrangement
- Moisture conditions
- Surface contamination
- Existing coatings
- Structural stability
- Required floor thickness
- Expected usage
- Accessibility and site conditions
The total area should also be measured accurately.
This stage is important because EPDM flooring is not designed to hide major substrate defects. Problems underneath the flooring can eventually appear as cracks, uneven areas, debonding, or surface failure.
Preparing the Base
Base preparation is one of the most important parts of EPDM flooring construction.
The rubber surface may be flexible, but it still requires a stable and properly engineered foundation.
Depending on the project, the substrate may be:
- Concrete
- Asphalt
- Cementitious screed
- Existing suitable sports base
The base should be structurally sound, reasonably smooth, clean, and capable of supporting the proposed flooring system.
Any weak or loose material should be removed.
Cracks, holes, depressions, damaged edges, and uneven sections should be repaired using appropriate materials before proceeding.
Why Base Preparation Matters
If the foundation moves excessively or contains significant defects, the EPDM surface can experience:
- Cracking
- Unevenness
- Delamination
- Water-related damage
- Premature wear
- Localized depressions
A professional installer therefore treats the substrate as a major component of the flooring system rather than simply as a surface underneath the rubber.
Cleaning the Substrate
Once repairs are complete, the surface must be thoroughly cleaned.
Dust, dirt, oil, loose particles, paint residue, cement laitance, grease, and other contaminants can interfere with bonding.
Depending on the substrate condition, contractors may use:
- Mechanical grinding
- Shot blasting
- Industrial vacuum cleaning
- Pressure cleaning where appropriate
- Manual cleaning
- Surface brushing
The final method depends on the substrate and project conditions.
The objective is to create a clean and suitably prepared surface for the next layer.
Checking Drainage and Surface Slope
Outdoor EPDM flooring must be designed with proper water management.
Standing water can negatively affect the performance and lifespan of a flooring system, particularly when drainage problems exist below or around the finished surface.
Before installation, contractors should confirm that:
- Drainage points are functional
- Surface slopes are appropriate
- Water can move away from the flooring area
- Drain channels are unobstructed
- Low spots have been corrected
- Existing drainage infrastructure is suitable
Drainage should be planned during the civil construction stage rather than treated as an afterthought.
Moisture Testing
Moisture is another critical consideration.
Installing resin-bound or polyurethane-based flooring over a substrate containing excessive moisture can create bonding and curing problems.
Professional contractors should assess the substrate’s moisture condition using an appropriate testing method before applying primers or binders.
If moisture levels are unsuitable, the installation should not simply continue because the surface appears dry.
The cause of excessive moisture should be investigated and corrected where possible.
Applying the Primer
After the substrate has been prepared and approved, a compatible primer may be applied.
The primer helps improve adhesion between the prepared substrate and the flooring system.
The correct primer depends on:
- Substrate type
- Binder system
- Manufacturer specifications
- Environmental conditions
- Surface porosity
- Project requirements
Primer should be applied uniformly rather than leaving heavily concentrated or completely untreated areas.
The installer must also observe the manufacturer’s recommended coverage rate and curing or overcoating window.
Installing the Shock-Absorbing Layer
For applications where enhanced cushioning and impact attenuation are required, an EPDM system may include a resilient base or shock pad.
A common approach involves installing rubber granules or a prefabricated cushioning layer below the colored EPDM wearing surface.
The cushioning layer helps improve:
- Impact absorption
- Underfoot comfort
- Surface resilience
- User safety
- Sports and recreational performance
The required thickness depends on the application and the performance requirements of the project.
Playgrounds, jogging tracks, and sports-related surfaces may require different construction specifications.
Preparing the EPDM Rubber Granules
The EPDM granules must be selected according to the required application and surface specification.
Factors that can influence material selection include:
- Granule size
- Color
- Density
- Quality
- UV resistance
- Intended application
- Required surface texture
The granules are normally combined with a suitable polyurethane binder.
Accurate proportioning is important because the binder must adequately coat the rubber particles without creating an excessively hard or poorly bonded surface.
Mixing EPDM Granules With Polyurethane Binder
This stage requires considerable attention to detail.
EPDM granules are placed into a suitable mixer, followed by the specified polyurethane binder.
The materials are mixed until the granules are evenly coated.
A professional installation team controls:
- Material proportions
- Mixing duration
- Batch consistency
- Ambient temperature
- Material temperature
- Working time
- Binder distribution
Poor mixing can create areas where the granules are inadequately bonded.
Excessive binder can also affect the texture, flexibility, appearance, and cost of the system.
The objective is a consistent mixture that can be placed uniformly across the prepared surface.
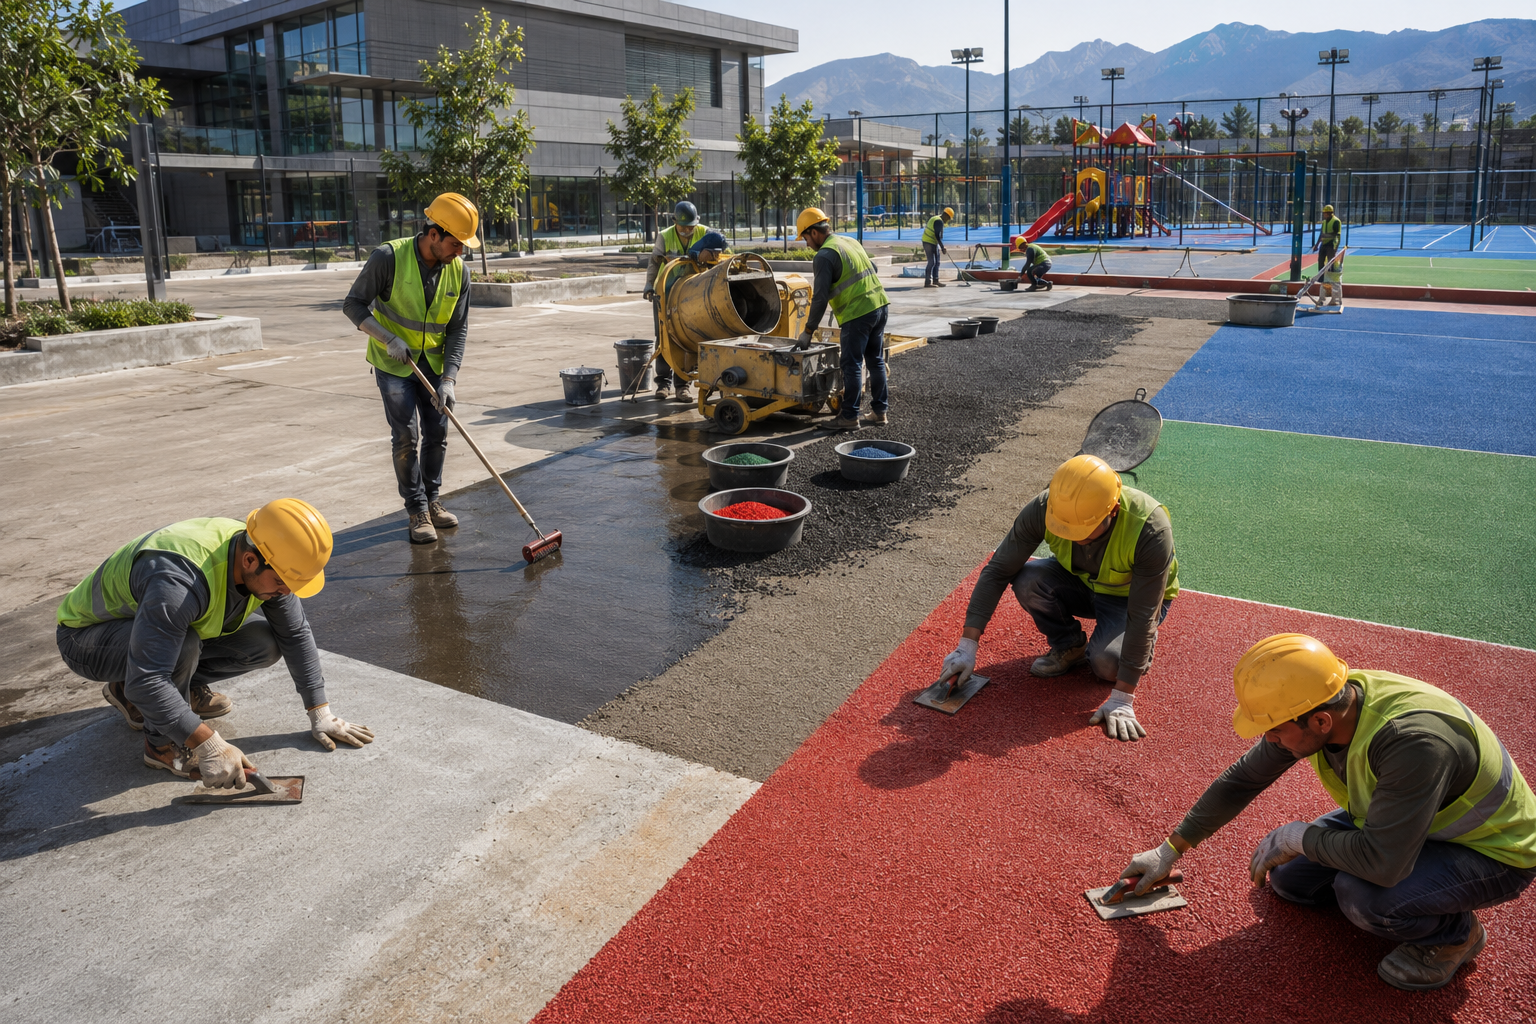
Laying the EPDM Surface
The prepared rubber mixture is transported to the installation area and distributed over the designated section.
Workers spread the material to achieve the specified thickness.
Specialized hand tools and installation equipment may be used depending on the size and design of the project.
The surface is then carefully leveled and compacted.
Uniform thickness is extremely important.
If some areas are too thin, performance and durability may be reduced. If other areas are significantly thicker, the surface may become uneven and material consumption can increase.
Professional installers therefore work methodically across the floor instead of randomly placing batches.
Troweling and Surface Finishing
After placement, the EPDM mixture is finished using appropriate troweling techniques.
The objective is to create a:
- Smooth surface
- Uniform texture
- Consistent thickness
- Properly bonded finish
- Visually clean appearance
The troweling process must be controlled carefully.
Overworking the surface can affect texture and appearance, while insufficient finishing can leave an uneven surface.
The installer must also pay attention to transitions, edges, joints, drainage points, and areas around fixed structures.
Creating Patterns and Color Designs
One of the major advantages of EPDM flooring is design flexibility.
Different colored EPDM granules can be used to create:
- Geometric patterns
- Activity zones
- Decorative shapes
- School logos
- Playground graphics
- Directional markings
- Training zones
- Colored pathways
For complicated designs, the layout should be marked before installation.
This reduces the possibility of irregular shapes, incorrect positioning, or unwanted color mixing.
Edge Detailing
The edges of an EPDM floor require proper attention.
Where the rubber surface meets:
- Kerbs
- Walls
- Drainage channels
- Concrete paths
- Metal edges
- Other flooring systems
the transition should be properly detailed.
Weak or poorly finished edges can become vulnerable to water penetration, mechanical damage, and lifting.
Good edge detailing improves both appearance and long-term performance.
Curing the Flooring
Once installation is complete, the surface needs sufficient time to cure.
Curing allows the polyurethane binder to develop the required bond and mechanical properties.
The curing period can vary depending on:
- Binder formulation
- Temperature
- Humidity
- Ventilation
- Surface thickness
- Weather conditions
- Manufacturer recommendations
The floor should be protected from unnecessary foot traffic, vehicles, water exposure, contamination, and other disturbances during curing.
One of the most common mistakes is allowing people to use the surface before the system has adequately cured.
Final Inspection
After curing, the finished floor should be inspected carefully.
A professional quality inspection can check:
- Surface uniformity
- Thickness
- Bonding
- Color consistency
- Drainage
- Edge finishing
- Visible defects
- Surface texture
- Cracks or loose areas
- Transition details
Any localized defect should be investigated and repaired using a compatible system.
For specialized safety or sports applications, additional performance testing may be required depending on the project’s specifications and applicable standards.
How Long Does Take?
The installation duration depends on the size and complexity of the project.
A small recreational area may be completed relatively quickly, while a large jogging track, playground, or sports facility can require considerably more time.
The overall schedule depends on:
- Area size
- Base construction
- Surface preparation
- Number of layers
- Flooring thickness
- Design complexity
- Weather
- Temperature
- Humidity
- Material curing requirements
Importantly, installation time and curing time are not the same thing.
A floor may appear finished but still require additional curing before it can safely receive normal use.
What Factors Affect Flooring Cost?
EPDM flooring cost is not determined simply by the price of rubber granules.
The final project cost can depend on:
1. Area Size
Larger projects may have different material and labor economics than small installations.
2. Base Condition
A damaged or poorly prepared base may require additional repair, leveling, grinding, or reconstruction.
3. Flooring Thickness
Thicker systems require more rubber and binder.
4. Cushioning Requirements
Projects requiring additional impact attenuation may need a dedicated shock-absorbing layer.
5. EPDM Granule Quality
Material quality, color, size, and formulation can affect the total cost.
6. Design
Simple single-color installations generally require less labor than complex patterns, graphics, or multiple-color designs.
7. Location
Transportation, site access, labor availability, and project logistics can influence pricing.
8. Drainage and Civil Work
If drainage improvements or base reconstruction are required, they can significantly change the overall project budget.
For an accurate estimate, the site should be inspected and the complete flooring specification should be defined before pricing.
Common Mistakes During
Even a high-quality flooring material can perform poorly when installation practices are inadequate.
Some common mistakes include:
Installing Over an Unstable Base
EPDM cannot compensate for major structural movement in the substrate.
Ignoring Moisture
Excessive moisture can contribute to adhesion and curing problems.
Poor Surface Cleaning
Dust, oil, and loose particles can reduce bonding.
Incorrect Binder Ratio
Incorrect material proportions can affect strength, flexibility, appearance, and durability.
Uneven Thickness
Inconsistent thickness can produce differences in performance and appearance.
Poor Mixing
Incomplete coating of granules can result in weak areas.
Working in Unsuitable Weather
Temperature and humidity can influence binder behavior and curing.
Opening the Area Too Early
Premature traffic can damage the uncured surface.
Neglecting Drainage
Standing water can shorten the useful life of an outdoor flooring system.
Hiring Based Only on the Lowest Price
The cheapest quotation may not represent the best value if it excludes proper base preparation, quality materials, adequate thickness, skilled installation, or testing.
How to Choose a Professional Flooring Contractor
Selecting the right contractor is as important as selecting the right material.
Before awarding an EPDM flooring project, consider asking the contractor about:
- Previous EPDM flooring projects
- Type of EPDM granules being used
- Binder specification
- Proposed flooring thickness
- Base preparation methodology
- Moisture testing procedure
- Drainage planning
- Installation team experience
- Curing procedure
- Warranty terms
- Maintenance requirements
- Project-specific technical specifications
It is also useful to inspect completed installations rather than relying only on photographs.
An experienced contractor should be able to explain why a particular flooring system is suitable for the application, not simply quote a price per square foot.
Flooring Maintenance
Although EPDM flooring is designed for demanding environments, regular maintenance can help preserve its appearance and performance.
Routine maintenance may include:
- Removing leaves and debris
- Cleaning dirt accumulation
- Addressing spills promptly
- Checking drainage points
- Inspecting damaged areas
- Preventing sharp objects from contacting the surface
- Avoiding unnecessary heavy loads
- Repairing localized damage promptly
For playgrounds and public recreational areas, periodic inspections are particularly important because frequent use can gradually reveal damaged or worn sections.
Advantages of Professionally Installed Flooring
A properly designed and installed EPDM system can provide several benefits.
Excellent Shock Absorption
Its resilient construction can provide a more comfortable surface for activities where repeated impact occurs.
Slip-Resistant Texture
The textured rubber surface can provide useful traction when appropriately specified.
Weather Resistance
EPDM is widely valued for its resistance to outdoor environmental exposure.
Design Flexibility
Multiple colors and patterns can transform functional areas into attractive recreational spaces.
Comfortable Underfoot
Compared with hard concrete surfaces, a properly engineered rubber system can provide a softer and more forgiving walking or activity surface.
Low Routine Maintenance
Once correctly installed, EPDM generally does not require complicated daily maintenance.
Long-Term Value
Good-quality materials combined with proper substrate preparation and professional installation can provide a durable flooring solution.
Final Thoughts
flooring installation is much more than spreading colored rubber granules over a concrete or asphalt surface. The finished performance depends on the complete construction system—from site inspection and drainage planning to substrate preparation, moisture control, priming, cushioning, rubber mixing, troweling, curing, and final inspection.
The most important principle is simple: the quality of the finished EPDM floor can never be separated from the quality of its installation.
A professionally constructed system should have a stable base, suitable drainage, compatible materials, consistent thickness, proper binder mixing, controlled installation conditions, and sufficient curing time.
Whether the project is a children’s playground, jogging track, school activity area, outdoor gym, recreational park, or sports facility, the flooring specification should be selected according to the actual use of the space.
If you are planning an EPDM flooring project, start with a proper site assessment and technical specification rather than choosing a flooring system based only on price. The right combination of materials, construction methodology, workmanship, and maintenance can make the surface safer, more attractive, and considerably more durable over its service life.