
Introduction
Building a squash court is not like building a regular room with four walls and a floor. Every surface plays a role in the game itself — the walls are part of the playing field, the floor has to grip and glide at the same time, and the lighting has to work with a small, fast-moving black ball instead of against it. If you get any one of these elements wrong, you don’t just end up with an ugly room; you end up with a court that plays badly, wears out fast, or fails certification for competitive use.
This guide walks through everything that goes into constructing a professional-grade squash court, from the first planning decisions down to the final coat of paint. Whether you’re a club owner, a school administrator, a contractor bidding on a sports facility project, or a homeowner who wants a private court, this should give you a realistic picture of what the process actually involves.
1. Understanding What Makes a Squash Court Different
A squash court is essentially a sealed rectangular box. Unlike a basketball court or a badminton court, where the walls are just boundaries, in squash the walls, floor, and even the back wall are active parts of gameplay. The ball can strike any of the four walls (front, back, and two side walls) during a rally, so surface quality, flatness, and rebound consistency matter enormously.
This changes the entire construction approach. You’re not just building a room — you’re building a precision playing surface on all six sides (four walls, floor, and ceiling for lighting and ventilation purposes).
Key requirements that shape every decision:
- Consistent ball bounce across the entire wall surface
- A floor that allows fast lateral movement without excessive slip or grip
- Uniform lighting with no glare and no shadow zones
- Sound insulation, since the ball impact and player movement generate real noise
- Climate control, since temperature and humidity affect both the ball and the walls
2. Standard Dimensions and Layout
Before any construction begins, the court dimensions need to be locked in according to World Squash Federation (WSF) standards, especially if the court will host any competitive play.
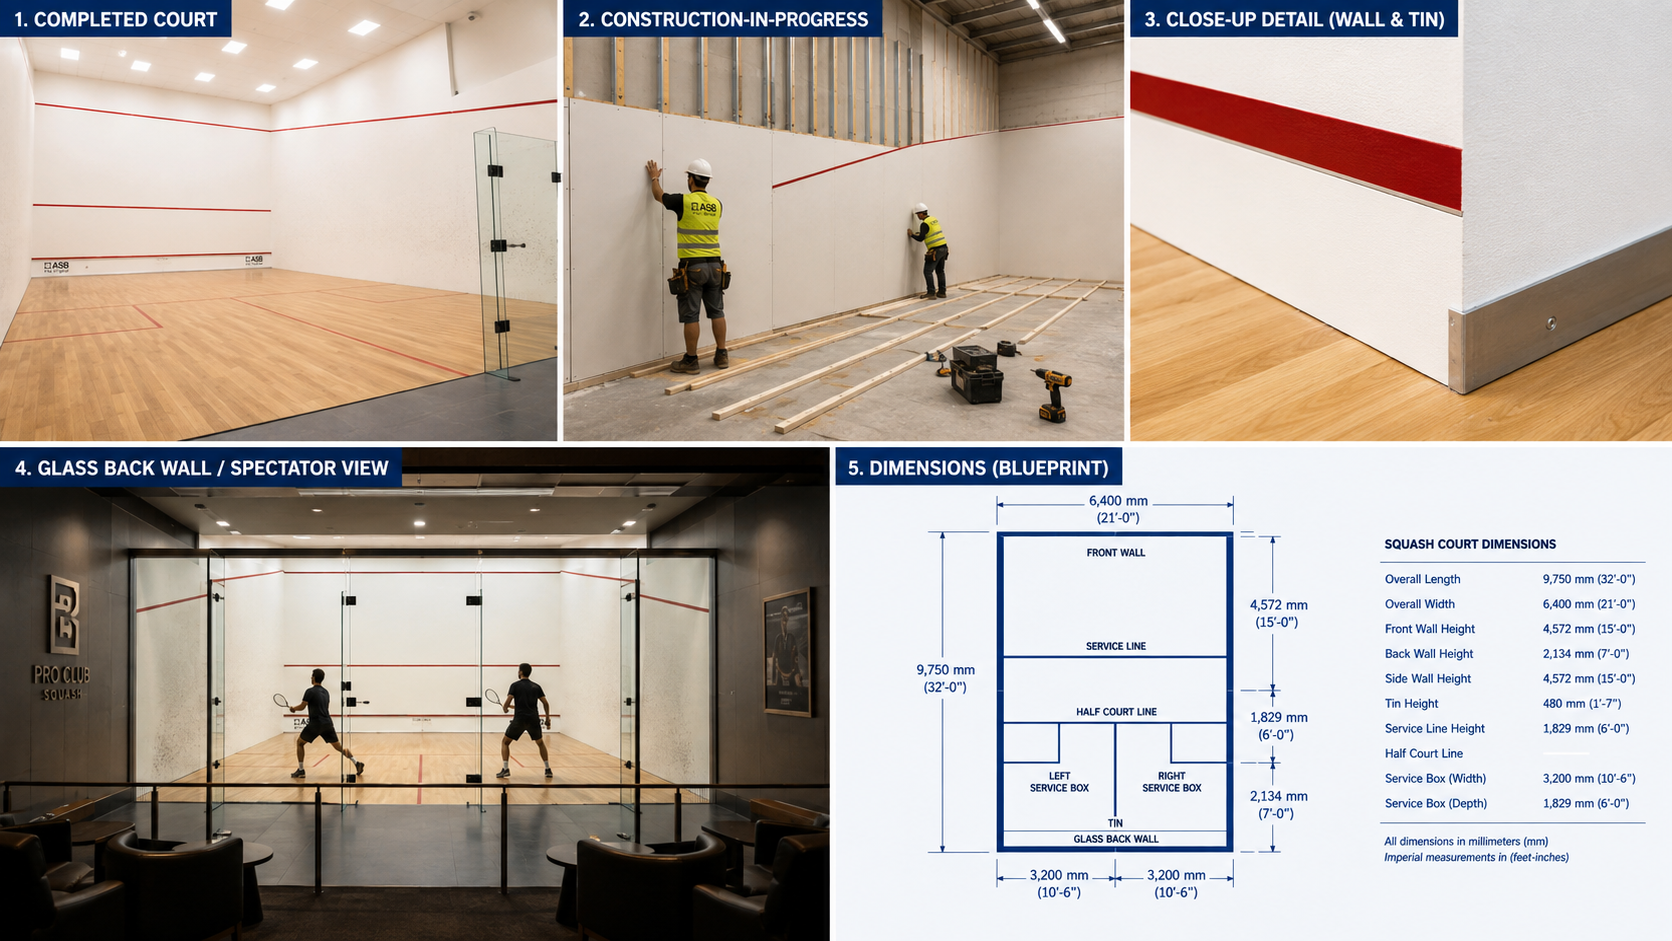
Standard singles court dimensions:
- Length: 9.75 metres (32 feet)
- Width: 6.4 metres (21 feet)
- Front wall height: 4.57 metres (15 feet)
- Back wall height: 2.13 metres (7 feet)
- Side wall height: sloping from front to back, following the tin and out-line markings
- Ceiling height clearance: minimum 5.64 metres (18.5 feet) recommended for professional play, though minimums vary by governing body
There’s also a doubles court format, which is wider (roughly 7.62 metres) and used far less commonly, mostly in North America.
Getting these numbers right isn’t optional if you want the court sanctioned for league or tournament play. Even a few centimetres off in wall height or court length can disqualify a court from official certification, so it pays to work from certified architectural drawings rather than estimating from a rulebook diagram.
3. Site Selection and Foundation Planning
Choosing the location
Squash courts are usually built indoors, either as standalone structures or embedded within a larger sports complex. A few site factors matter more than people expect:
- Floor levelness of the existing slab — even minor unevenness compounds into major problems once flooring is installed
- Ceiling height — many buildings simply don’t have enough vertical clearance without expensive structural modification
- Access for materials — wall panels, flooring sections, and glass back walls (if used) are large and need a clear path in
- Noise isolation from neighbouring spaces — squash is louder than most people assume, both from ball impact and footwork
Foundation and subfloor
The foundation needs to support a sprung or semi-sprung floor system, which is heavier and structurally different from a standard tile or carpet floor. A concrete slab is the typical base, but it needs to be properly cured, moisture-tested, and levelled to a tight tolerance — usually within a few millimetres over the entire court area. Any moisture coming up through the slab will eventually damage timber flooring or cause the plaster wall base to weaken over time, so a proper damp-proof membrane is essential before anything else goes down.
4. Wall Construction: The Heart of the Court
This is where squash court construction differs most from ordinary building work. The walls need to be dead flat, extremely hard-wearing, and capable of producing a consistent, predictable rebound for thousands of ball strikes a day.
Common wall materials
1. Plaster on solid block or brick backing This has traditionally been the gold standard. A masonry backing wall is built first, then finished with several coats of a specialised hard plaster, sanded down to an extremely smooth, flat finish. It produces excellent rebound consistency but takes skilled tradespeople and significant drying/curing time.
2. Prefabricated modular wall panels Increasingly popular for speed and consistency. These are engineered panels — often a resin or fibreboard composite — manufactured off-site to precise flatness tolerances, then installed and jointed on-site. They cut construction time dramatically and are easier to repair if damaged, since a single panel can be swapped out rather than replastering an entire wall.
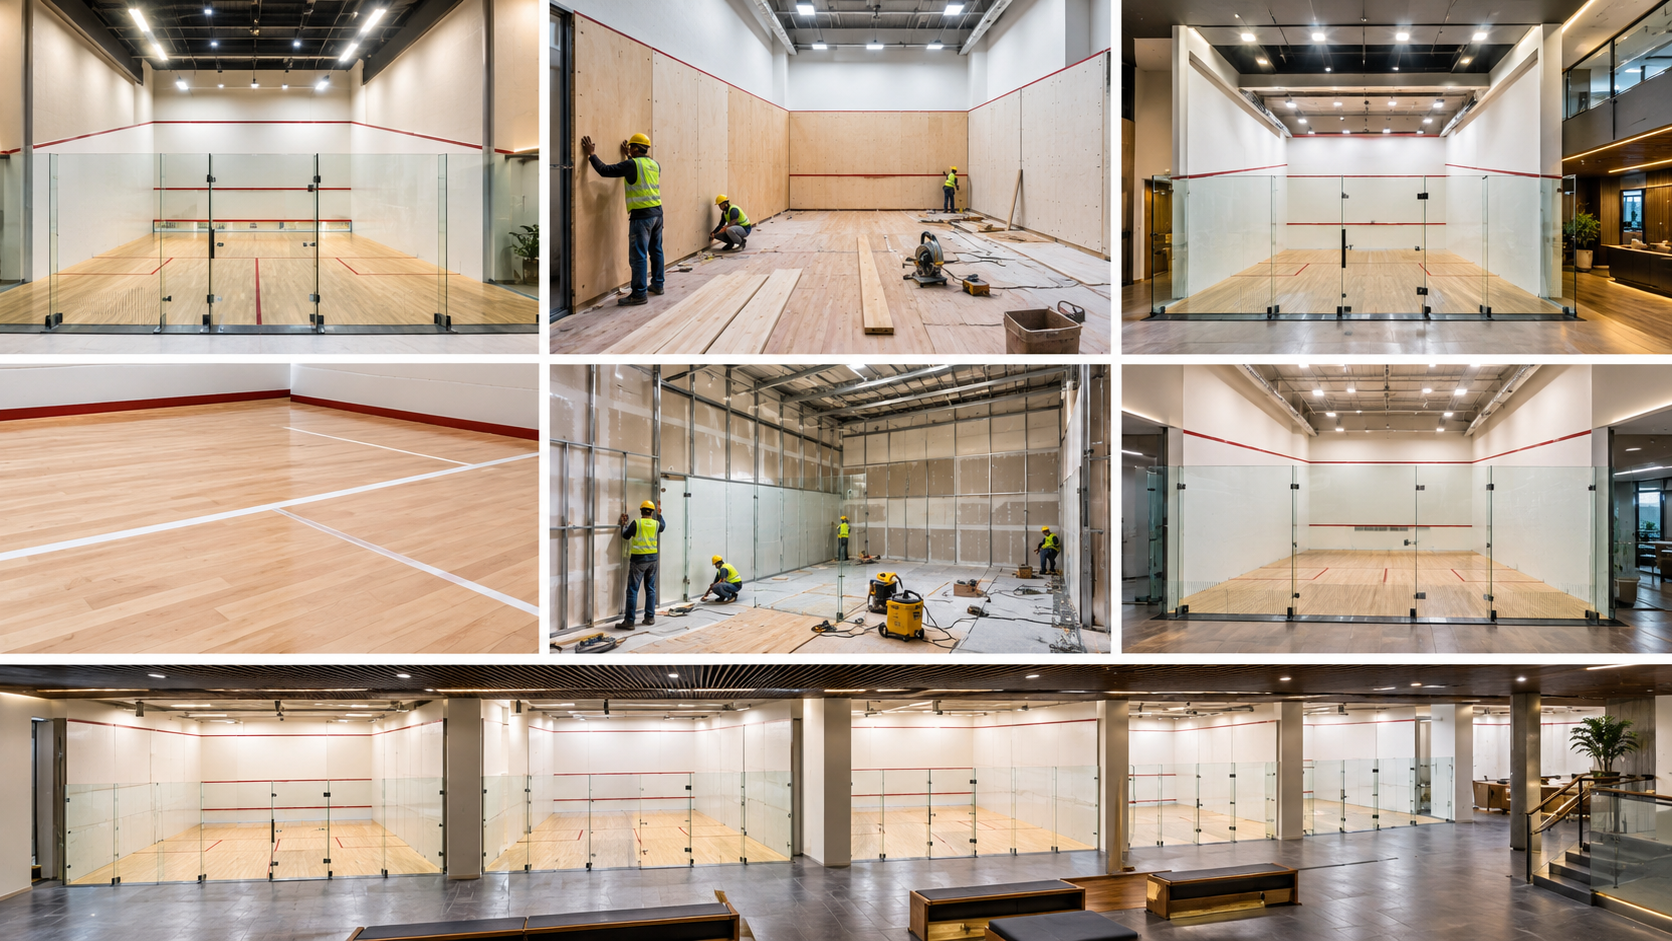
3. Glass back walls Most competitive and show courts now use a toughened glass back wall (and sometimes side walls too), which allows spectators to watch through the wall. Glass walls require a specialised aluminium or steel frame system and toughened, impact-rated glass panels engineered specifically for squash ball impact, not standard architectural glass.
Wall finishing
Regardless of material, walls are painted with a matte, non-reflective white or off-white finish. Glossy paint creates glare under court lighting and can also affect ball visibility for players. Line markings (the tin, service line, half-court line, and out-of-court lines) are then applied with precise, durable court-marking paint or tape, following exact measurements from the governing body’s rulebook.
The tin — the metal or composite strip along the bottom of the front wall — deserves special mention. It needs a distinct percussive sound when struck so players and referees can clearly hear when a shot has hit it. This is usually a resonant board mounted just behind the plaster or panel surface, tuned for the right acoustic response.
5. Flooring: Where Speed Meets Safety
Squash involves constant sprinting, lunging, and sudden direction changes, so the floor has to absorb impact while still allowing quick footwork. Most professional courts use one of the following systems:
Solid timber flooring
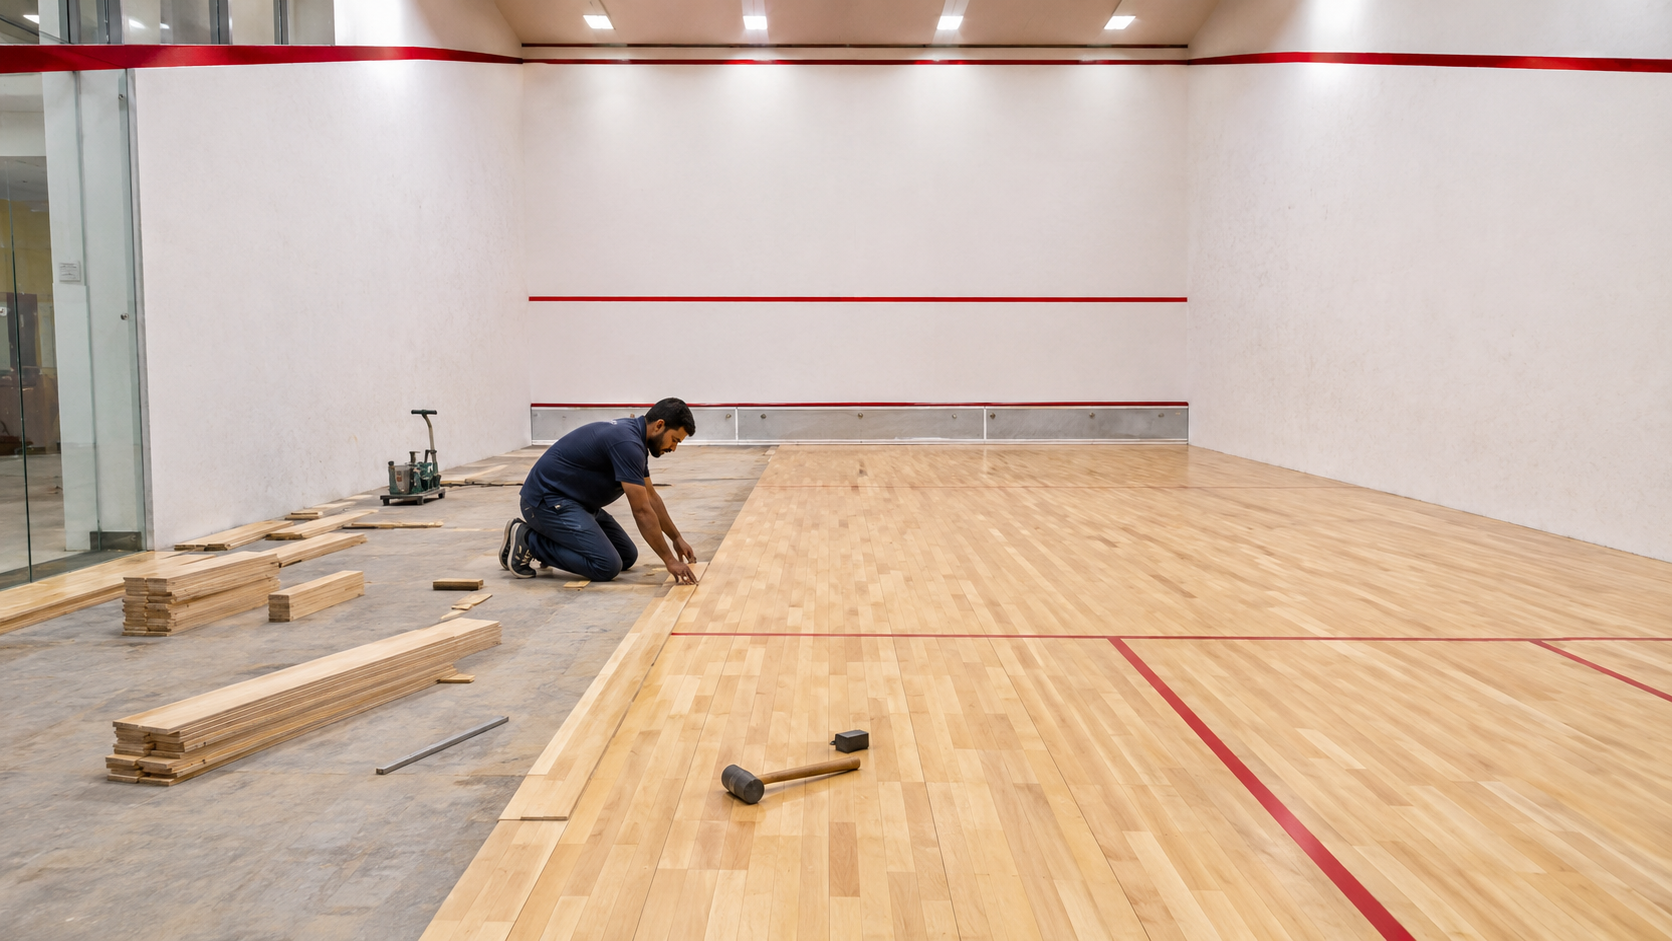
Hardwood — often maple — laid over a sprung subfloor system with resilient pads or battens underneath. This is the traditional choice and remains popular for its feel and consistent bounce characteristics.
Sprung floating floor systems
A layered system: concrete subfloor, resilient rubber or foam pads, plywood sheathing, and a hardwood or synthetic top layer. The “spring” reduces joint stress on players’ knees and ankles during repeated hard stops.
Synthetic/vinyl sports flooring
Increasingly used in multi-purpose facilities where a squash court might occasionally host other activities. These are more affordable and easier to maintain but generally don’t match the ball response and feel of a proper timber court.
Whatever system is chosen, the floor must be sanded, sealed, and finished so that it has enough grip for footwork but doesn’t cause excessive friction burns or drag during a sliding lunge. Floor finish is periodically reapplied as part of ongoing court maintenance, since a worn finish becomes both slippery and visually dull.
6. Lighting Design
Lighting is one of the most overlooked aspects of court construction, but it has a huge effect on playability. Because players are tracking a small black ball moving at high speed, any glare, flicker, or uneven light distribution becomes a real problem — not just an aesthetic one.
Key lighting principles:
- Even illumination across the entire court, with minimal hotspots or dark corners
- Lights mounted to avoid direct glare in players’ eyes, especially when looking up toward the front wall or ceiling during high shots
- Sufficient lux levels for competitive play — tournament-standard courts typically aim well above what’s needed for casual recreational courts
- Flicker-free fixtures, since older fluorescent lighting can visually interfere with fast ball tracking; LED fixtures with high-frequency drivers are now the standard choice
- Light fixtures recessed or protected so they can’t be struck by an errant ball
Lighting layout is usually planned by an electrical engineer working alongside the court manufacturer, since fixture placement interacts directly with ceiling height and glass wall positioning.
7. Ventilation, Acoustics, and Climate Control
Ventilation
A squash court is a sealed environment with players working extremely hard in a small space, so air exchange matters. Poor ventilation leads to a stuffy, humid court that affects both player performance and the longevity of the wall plaster and floor finish. HVAC systems for squash courts typically use ducted supply and return vents positioned to avoid direct drafts across the playing area, since a strong draft can affect ball flight in a way players will immediately notice.
Humidity and temperature control
Consistent humidity is particularly important because both the ball and the wooden floor are sensitive to moisture changes. A ball played in a cold, dry court behaves very differently from one played in a warm, humid one — it won’t bounce or “warm up” the same way, which noticeably changes the pace of the game.
Acoustic considerations
Ball strikes and footwork noise carry, especially in multi-court facilities. Sound-dampening in the structural walls (as opposed to the playing walls) and ceiling helps contain noise so it doesn’t bleed into adjacent courts, viewing areas, or other parts of the building.
8. Construction Process: Step-by-Step Overview
- Design and certification review — Confirm dimensions, ceiling clearance, and layout against governing body standards before any construction starts.
- Site preparation and foundation work — Level and cure the concrete slab, install damp-proofing, and confirm structural load capacity for flooring and wall systems.
- Structural framing — Build the backing walls (masonry, steel frame, or panel support structure) that will hold the court’s playing surfaces.
- Wall system installation — Apply plaster coats or install prefabricated panels and glass wall sections, achieving the required flatness tolerance.
- Floor system installation — Lay the subfloor, sprung support system, and final timber or synthetic surface.
- Line marking — Precisely measure and apply all required court markings.
- Lighting and electrical installation — Mount fixtures, wire circuits, and test for even coverage and glare.
- HVAC installation — Install ducting, vents, and climate control systems tuned for the enclosed court space.
- Finishing — Paint walls, seal and finish the floor, install door hardware, and add any viewing gallery or glass back wall elements.
- Testing and certification — Check ball bounce consistency, floor levelness, lighting levels, and overall compliance before handover.
Depending on the scale of the project — a single private court versus a multi-court club facility — this process can take anywhere from a few weeks to several months.
9. Cost Factors to Consider
Costs vary enormously depending on location, materials, and whether the court is a standalone build or part of a larger facility. Broadly, the major cost drivers are:
- Wall system choice — plastered masonry walls, modular panels, and glass back walls all sit at different price points, with glass typically being the most expensive per square metre
- Flooring system — solid timber sprung floors cost more than synthetic alternatives but often last longer and play better
- Building shell requirements — if the existing building doesn’t have adequate ceiling height, structural modifications can add significant cost
- Climate control — a properly specified HVAC system for a squash court is not the same as a standard room air conditioner and costs more accordingly
- Certification requirements — courts intended for competitive or tournament use often need additional inspection and adjustment to meet governing body standards, adding to both time and cost
For a realistic budget, it’s worth getting quotes from specialist squash court manufacturers rather than general contractors, since the wall and floor systems in particular are specialized products most general builders won’t have direct experience installing.
10. Maintenance: Keeping the Court Playable Long-Term
A squash court is a long-term asset if it’s looked after properly. Key ongoing maintenance tasks include:
- Regular floor cleaning with products that won’t leave the surface too slippery or too sticky
- Periodic floor resealing or refinishing, typically every few years depending on usage volume
- Wall inspection for cracks, chips, or plaster degradation, since even small imperfections can affect ball rebound
- Lighting fixture checks and bulb replacement to keep illumination levels consistent
- HVAC servicing to maintain stable temperature and humidity year-round
- Tin inspection, since this component takes repeated impact and can loosen or wear out its acoustic properties over time
Facilities that skip regular maintenance often find that a court which played beautifully in year one has degraded noticeably by year five — usually due to floor wear or gradual humidity damage to the walls, both of which are far cheaper to prevent than to fix.
Frequently Asked Questions
How much does it cost to build a squash court? Costs vary widely based on location, wall material, and flooring choice. A basic single court with plastered walls and a standard sprung floor sits at the lower end, while a court with a glass back wall, premium timber flooring, and full climate control can cost significantly more. It’s best to get quotes from specialist squash court builders rather than estimating from general construction rates, since the specialized wall and floor systems don’t map neatly onto standard building costs.
How long does it take to build a squash court? A single standalone court typically takes a few weeks to a few months from site preparation to handover, depending on wall system choice (prefabricated panels install faster than traditional plaster), whether structural modifications are needed for ceiling height, and how quickly materials can be sourced.
What is the minimum ceiling height needed for a squash court? Most governing bodies recommend a minimum clearance of around 5.64 metres (18.5 feet) for competitive play, though recreational courts can sometimes work with slightly less. Always check current official guidelines before finalizing a design, since insufficient clearance is one of the most common reasons buildings can’t host a compliant court without structural changes.
Can an existing room be converted into a squash court? Yes, if it meets the dimensional and ceiling height requirements. Conversions are common in gyms, warehouses, and multi-purpose sports facilities, but the floor usually needs significant work to install a proper sprung system, and the walls need to be rebuilt or resurfaced to squash-specific standards rather than simply painted over.
What is the best flooring material for a squash court? Solid hardwood — typically maple — over a sprung subfloor is considered the premium choice for ball response and player comfort. Synthetic or vinyl sports flooring is a more budget-friendly alternative, often used in multi-purpose facilities, but it generally doesn’t match timber’s feel or long-term durability under heavy use.
Why do squash courts use glass back walls? Glass back walls allow spectators to watch matches from outside the court, which is especially valuable for exhibition matches, tournaments, and club viewing areas. They require specialized toughened, impact-rated glass and a dedicated frame system engineered for repeated ball strikes, not standard glazing.
How often does a squash court need maintenance? Floor cleaning should happen regularly, but deeper maintenance like resealing or refinishing the floor is typically needed every few years, depending on usage. Walls, lighting, HVAC systems, and the tin should also be inspected periodically, since wear in any of these areas can noticeably affect gameplay before it becomes visually obvious.
Do squash courts need special lighting? Yes. Because players track a small, fast-moving ball, lighting needs to be even, glare-free, and flicker-free. LED fixtures with high-frequency drivers are now the standard, replacing older fluorescent setups that could visually interfere with fast ball tracking.
Is a permit or certification required to build a squash court? Standard building permits apply as with any construction project, and if the court is meant to host official league or tournament play, it will also need to meet certification standards set by the relevant squash governing body, covering dimensions, wall flatness, lighting levels, and flooring performance.
Final Thoughts
Building a squash court is a specialized construction project that sits somewhere between architecture and sports engineering. Every surface has a functional role in gameplay, which means the usual construction shortcuts that work fine in an ordinary room simply don’t apply here. Getting the dimensions, wall system, flooring, lighting, and climate control right from the start will save enormous cost and hassle down the line — and it’s the difference between a court that squash players actually enjoy playing on and one they quietly avoid.
If you’re planning a build, the smartest first step is usually engaging a specialist squash court contractor or manufacturer early in the design phase, well before the site work begins. Their experience with the specific tolerances and materials involved can help you avoid the kind of mistakes that are expensive — or sometimes impossible — to correct once the walls and floor are in.